


I’ve finally finished a project that has been in incubation for quite a while: a digital photo frame.
The process looked a little something like this:
- (2004) See article on web.
- (2004) Think “that sure would be cool!“
- (2004) Put it off for a while.
- (2004) Leave space for it when I design my desk.
- (2005) Put it off for a while.
- (2005) Realize that 19-20″ LCDs are really pretty cheap now, order a 19″ from Dell.
- (2005) Have a father in-law that is a skilled wood-worker. Realize that visiting him in Minnesota over Christmas is a perfect opportunity to get some help building the frame.
- (2005) Father-in-law builds a fantastic frame (I did help a little on the design).
- (2006) Stain the frame.
- (2006) Buy a mat (and drill a little hole for the power button).
- (2006) Install heavy duty hangers and a cable on the back of the frame box.
- (2006) Assemble and blog it!
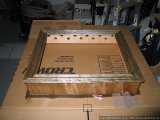
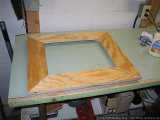
My father in-law, Harlan, gets all the credit for the top notch carpentry work. We sat down with the monitor and my initial ideas, and he basically ran with it from there. The first thing he did was create the inner frame that the holds the monitor. You can’t see any of this wood now that it is done, so it’s not the prettiest lumber. 🙂
The inner part of the inner frame is hollowed out so that the monitor sits less than 1/4″ inch back. The bottom of the monitor sticks out more than the top and sides, so the bottom was thinned out more than the top and sides. We also drilled holes in front of the buttons so they’d still be accessible.
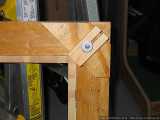
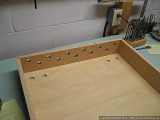
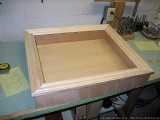
We (and when I say “we”, I mean “Harlan”) made the outer box next, matching the dimensions of the inner box. We added a series of holes to the top of the outer box frame for ventilation because you can’t see the top of the box anyway now that it is on the wall.
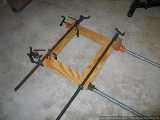
To attach the back, we took out a portion of the edge of the outer box so that the back could slide into the area and sit flush. There were ventilation holes added to the back too, along with 2 blocks on the inside of the back that allowed my wire attachment loops to sink into some real wood rather than the thin back piece.
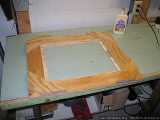
The face trim was baseboard molding from Home Depot, skillfully cut by Harlan and glued together. Once the face trim was glued together, we glued it to the outer box frame.
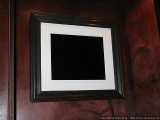
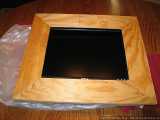
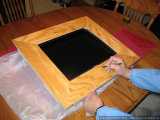
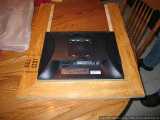
Once I got back to Denver, I stained the frame and had a local store make the mat. The outer mat is a nice linen while the inner mat is a simple while.
Though we drilled holes for all 4 of the buttons in the inner wood frame, I only chose to drill a single pin hole in the mat over the power button. I can push a paper clip in there to turn on and off the monitor as needed.
Going from front to back, the finished product goes something like this:
- Face frame
- Mat
- Inner frame
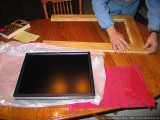
- Monitor (sitting in Inner frame)
- Back
Running this baby is a Mac mini that has taken residence under the desk, sitting atop the Quad. I may set the mini up as my new backup system as well if I’m not able to resurrect my PowerMac G41.
I will be setting up a little rsync action to move photos from the Quad to the “frame” as I optimize them for the size, etc. Right now I have a keyboard and mouse attached to the mini, but I’ll probably put those away in favor of VNC once I have it all set up the way I want it.
Without Harlan’s help, I don’t know how long it would have taken me to get the frame built – and I’m sure it wouldn’t have turned out as well as it did. Once again Harlan, thank you for all your help!
I’m really thrilled at how this all turned out and I’m looking forward to loading it up with my photos. 🙂
- I’ll find out tomorrow if it is just a bad power supply or not. [back]
Wow man, that is really slick. When’s your father-in-law going to start selling them??
This is AWESOME.
It just occured to me; you may like to do something like [this][] with your frame.
[this]: http://vrypan.net/lo[...]ickr-tv-box/
Congratulations, that looks very nice! Also that corner of your office makes your workspace look very inviting.
That is awesome.
Alex, you (and Harlan) are da man with da master plan. That is sooo cool. Droool~!!
Very cool man, I’m impressed. Great idea.
Excellent!
would an old laptop work if i disassemble the monitor and loosely fold it backward back-to-back with the keyboard? it would already have the OS, keyboard, wireless ethernet, cdrom, hard drive, ram…
Erm, you do know you can buy these now right?
heh, just kidding with you, thats an Awsome job!
I doubt there is a better digital photo frame around at the moment than yours! Commercially available 17″ models are available now, but for around the $500 mark. I would be interested to find out how much in total yours cost for parts (excluding labour).
It’s not fun to buy a digital frame… it’s better to made it !!!
I’m impressed. Great idea.
[…] – Scott and I attend MacWorld and are madly trying to get FeedLounge ready for launch. I finish my digital photo frame and run into the first of what will be several hardware issues in […]
That is one impressive work. Ingenious! Kudos to you.
“I’ve finally finished a project that has been in incubation for quite a while: a digital photo frame.”
I like the new invetion of your father in-law… He did a great job.. and it is totally work, right?… Give us more invention, so that we can have new idea… 🙂 Great JOB!!!
The finally work looks very attractive.